Anodizing aluminum
Anodizing aluminum can be hazardous because of the use of battery acid, typically (29% to 32% sulfuric acid). This describes is an alternative method using instead sodium bisulfate (NaHSO4), also known as sodium hydrogen sulfate. This is used to lower the ph in home swimming pools and is easy to find, mix, store, and work with.[1] A product name for this is pH Minus .
Background

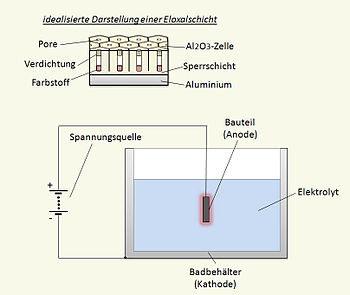
Aluminum has an oxide barrier coating because of a reaction with the oxygen in air. By using an electrolytic process the metal can have additional protection. In general there are two types of barrier coatings. The first is a thin, hard coating that increases the hardness and insulation properties. The second is a porous cellular structure that allows a dye to fill in the cells and provides a decorative and protective coating - as used here. This is a variable process that may require some experiments to determine what is happening. Longer anodizing times, different concentrations and temperature, different grade of aluminum, different current draw or voltage, and patience are all helpful.[1]
Required materials
- Distilled water for at least the sodium bisulfate solution and for final rinsing.
- sodium bisulfate (NaHSO4), aka sodium hydrogen sulfate. Used to lower pH in swimming pools. Needs to be at least 90% active ingredient.
- Optionally sodium hydroxide. (NaOH) aka lye or caustic soda. Has various household uses.
- Liquid or powder fabric dye, e.g. Rit Dye in the USA or Dylon in the UK. Colour of choice - although black is more difficult to achieve.
- Low voltage DC current source, e.g. a 6 Volt battery. A 500mA wall wart will also work. The current required for anodizing in general is very much a variable, but a guideline is 2.8 to 10 amps for one square foot of aluminum. Although this process is very open to experiment and optimization.
- Aluminum or lead for the cathode (connected to the DC supply negative).
- The aluminum piece to anodize.[1]
Preparation
- To clean and prepare the aluminum surface, make a 2% solution of sodium hydroxide. 4 grams of in 196 ml. of water, or 1 teaspoon in ¾ cup water, distilled water is better. This measurement is not critical. Mix well with plastic or wood implement.
- Make a 20 % solution of Sodium bisulfate. 40 grams of sodium bisulfate in 160 ml. of tap water, or 2½ tablespoons to 2/3 cup water. Mix well with plastic or wood implement. The pH will be between 1 and 2. This can be increased up to 30% if needed.
- Make the dye solution, e.g. 5 ml. liquid dye to 250 ml of water, or ½ tablespoon dye to 1 cup water. This measurement is not critical and the concentration can be increased based on results.[1]
Procedure

Prepare the aluminum for anodizing by cleaning thoroughly using a fine steel wool to remove the surface contaminants and reduce imperfections. Take care not to cause micro metal contamination by pressing too hard. Note that the finish that goes into the tank is what comes out of the tank. Follow by a wash with a plastic scouring pad and washing up detergent (or 99.9% isopropyl alcohol). Rinse well and either proceed to the sodium hydroxide etch for 2 to 3 minutes and rinse again, or go directly to the anodizing solution. The etch step provides some bite for the solution and allows for slightly larger cell size. Aluminum alloys are highly variable so if possible experiment with scrap pieces.[1]
Attach the negative battery lead to the cathode which should be at least as large as the piece being anodized. Attach the positive lead to the piece to be anodized. Ideally use an aluminum connector and relocate it during the process to make sure that all of the item is anodized.
A large amount of small bubbles of hydrogen will be seen at the cathode. The time required for anodizing depends on alloy composition, current draw, solution temperature, and solution concentration. Start with 30 to 60 minutes. A good indicator is that the piece will have a slightly yellow tinge as the index of refraction changes with cell growth. Rinse the completed part in cold water and place in the dye bath at room temperature. Allow about 60 minutes and rinse the part in cold water. If the color density is low, place it back in the dye bath for a longer period. When the color is correct, place the piece in boiling tap water for 20 to 30 minutes to seal in the dye. If a further protective coating is desired a clear coat of spray acrylic can be added to highlight the color.[1]
References
External links
- Electrochemistry Encyclopedia: Anodizing by Robert S. Alwitt, December 2002
- Wikipedia:Anodizing
- Wikipedia:Photosensitive Anodized Aluminum
- McMaster-Carr: About Aluminum - lots of material dimensional information.
- WikiHow: How To Anodize Aluminum
- Instructables: Anodizing Metal At Home
- Home Aluminum Anodizing – using sulphuric acid